Feeds:
Posts
Comments

Archive for February, 2011

Chocolate Cobbler

My past 4 posts all featured chocolate recipes. White chocolate is definitely my favorite, milk chocolate is real good too and dark chocolate, well, to be honest, dark chocolate does nothing for me. I won’t even go near the stuff. Of course dark chocolate has to be the healthy kind.

So…ready for some more chocolate?

One of my best friends lives in Detroit. I hate that we live so far away and that we only get to see each other once a year if that. When we do get together it’s guaranteed to be tons of fun and I know that I can always talk to her about anything. The one thing that we can’t seem to be able to do well together is bake. I think it’s because we talk too much and somehow end up neglecting important steps.

Take a recipe similar to this one, where the key ingredient is water which makes a saucy cake. Of course we forgot the water, of course the dessert turned out dry and hard…and ultimately abandoned.

Take the boxed mix that we used to make brownies. Even that didn’t turn out. How is that even possible?

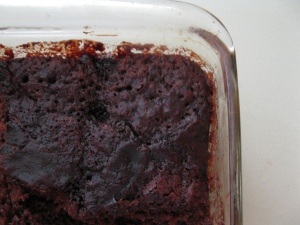
Fortunately/unfortunately when I made this recipe, best friend wasn’t there…aka the recipe turned out. A delicious cake/brownie (yes it’s called a cobbler, no I don’t know why) that creates its own chocolate sauce as it bakes. Top with ice cream and you’ve got yourself one amazing dessert. This makes for a great girls night in recipe, you know, for those Bachelor/Bachelorette finales. Of course I would!

So fast, so easy, so so good. Cue my craving. Just make sure that you remember the water, it’s sort of important.

Chocolate Cobbler

Adapted from Bake or Break

1 & 1/4 cups sugar, divided into 3/4 cup & 1/2 cup

1 cup flour                          7 tbsp cocoa, divided into 3 tbsp & 4 tbsp

2 tsp baking powder          1/4 tsp salt

1/2 cup milk                        1/3 cup butter, melted

1 & 1/2 teaspoons vanilla extract         

1/2 cup brown sugar          1 & 1/2 cups hot water

Preheat oven to 350°.

Stir together 3/4 cup sugar, flour, 3 tablespoons cocoa, baking powder, and salt. Stir in milk, butter and vanilla, mixing until smooth. Pour into an ungreased 8-inch square glass baking pan.

In a small bowl, mix 1/2 cup sugar, brown sugar, and 4 tablespoons cocoa. Sprinkle evenly over batter.

Pour hot water over the top. Do not stir.

Bake for 35-40 minutes, or until center is almost set. Let stand for 15 minutes, then serve. Use the chocolate sauce in the bottom of the pan to spoon over servings.
Read Full Post »


I’m not a huge fan of fast food. I’ve never stepped into an Arby’s or a Harvey’s. When at Wendy’s I get the salad, and I can’t even remember the last time that I had actual McDonald’s food. I say “actual food” because I am 100% guilty of purchasing McDonald’s sundaes, McFlurries and ice cream cones. Don’t even get me started on Dairy Queen, when summer hits we become best friends all over again.

Subway may be my main exception for the lack of fast food. If I’m ever out-of-town, Subway is often on the safe list of places to grab food from. Classic ham and cheese sandwich with a few of the toppings and don’t you dare forget the cookie. No not the chocolate chip cookie, the best cookie that I’ve ever eaten, the white chocolate chip macadamia nut one.

After receiving a can of macadamia nuts from Hawaii I decided that I was tired of waiting for the rare trip to Subway to get my hands on their cookies and instead opted to make my own. For some reason I always thought that these cookies would be hard to make. Turns out the only hard step is finding macadamia nuts. These cookies were just as basic to make as any batch of cookies and had the house smelling sweet and delicious in no time.

Chewy cookies just like the bought ones…looks like Subway may have just lost a customer.

White Chocolate Macadamia Nut Cookies

Adapted from Brown Eyed Baker

2 cups flour              ½ tsp baking soda
½ tsp salt                 ¾ cup melted butter
1 cup brown sugar   ½ cup white sugar
1 egg                       1 egg yolk
3/4 tbsp vanilla        3/4 cup chopped macadamia nuts
1 cups white chocolate chips

Preheat the oven to 325 degrees F. Grease baking sheets.

In a medium bowl, combine the flour, baking soda and salt.

In a large bowl beat together the melted butter, brown sugar, and white sugar. Beat in the egg, then the egg yolk and vanilla.

Gradually add the flour mixture to the sugar mixture and stir with a wooden spoon until just moistened. Mix in the macadamia nuts and white chocolate chips.

Drop by tablespoons onto baking sheets.

 Bake for 12-15 minutes or until the edges look golden brown and the middles don’t look quite set. (12 was enough for me)

Read Full Post »

Today was one of those days that seemed to never end, and then when it did relief flooded in and the sunshine was still beaming. I love where I live, surrounded by water and running paths galore. Running after school in the sunshine felt so good. Amazing what a little bit of sun and warmth can do for you. On the plus side too, spring break is just a few weeks away!

Back inside, there’s been some serious use of rice krispies going on in the blogging world these days…and I’ve been seriously tempted. Hot cocoa marshmallow rice krispies, better than crack brownies, marshmallow crunch brownie bars…what’s that? You have a recipe for me too? Perfect, add it to the “to make” list!

If it’s not rice krispies then usually it’s chocolate, and if it’s not chocolate then it’s definitely peanut butter that my go-to baking blogs are featuring. So why not roll all of the good things of life into 1 packed dessert.

I decided to do just that and made these peanut butter rice krispy treats, dipped them in melted chocolate, placed the treats in the fridge to cool and harden, lost all will power…and devoured them.

Quick to make, no baking required and a combination to die for. Success.

Peanut Butter Balls

Adapted from Tablespoon

1  cup semi-sweet milk chocolate chips      2  tbsp water

1  cup peanut butter                                  1/2  cup icing sugar

1/2  cup corn syrup                                     2  cups Rice Krispies cereal

Line cookie sheet with waxed paper.

In a saucepan, heat chocolate chips and water over medium heat, stirring constantly, until mixture is smooth. Set aside to cool.

In a medium bowl, combine the peanut butter, icing sugar and corn syrup until well blended. Stir in the rice krispies until evenly coated.

Roll the mixture into individual balls, place the balls on the cookie sheet and press slightly so the bottoms of the balls are flat. 

Spoon cooled chocolate onto each ball.

Refrigerate for 30 minutes or until firm. Store in covered container in refrigerator.

Read Full Post »

Valentines Day has never been a big thing for me.

Elementary school always meant parties to celebrate the holidays and I liked that. Valentines Day we would make our own “mailboxes” so that everyone could deliver Valentines cards and chocolate to each other. Then grade 3 hit.

This one day I got to go to the orthodontist where an appliance was cemented into the roof of my mouth. The best part of it was that it came with a key which was needed to crank the appliance tighter every night. Aka, a child’s worst nightmare. Oh, and don’t forget the part that this was “installed” on Valentines Day in grade 3. Needless to say I wasn’t allowed to eat any chocolate or candy and therefore wasn’t in a very loving mood.

Grade 4 things improved. The appliance was gone and a new student, the hottest boy I’d ever seen, now graced the hallways of our elementary school. He was a stud. Tall, dark and handsome, athletic and boy did he ever know how to rock the mushroom hair cut and tear-aways. Long story short, I was 1 of 3 girls that he gave a Valentine to.

He gave me an Aladdin Valentine and in return I gave him my heart.

Celebrating Valentines Day hasn’t really been a top priority for the past few years but then I saw these on Smitten Kitchen the other day and knew that they had to be made. My heart shaped cookie cutter was bigger than the one that Deb used so I only ended up getting 9 large pieces per sheet (instead of her 16). Because my brownies were a tad bit undercooked, and therefore stickier, I thankfully didn’t have a huge problem with crumbling edges.

The chocolate or the white chocolate brownie, I still can’t decide which one is my favorite. I guess I should keep taste testing to determine what’s best. To save you the trouble. That’s right, I’m doing it for your sake…

Brownies made with love, displaying love and tasting delicious…that right there has Valentines Day written all over it!

Black and White Brownies

Adapted from Smitten Kitchen

6 tbsp semi-sweet mini chocolate chips or 7 tbsp white chocolate chips

1/2 cup butter        3/4 cup plus 2 tablespoons sugar
2 eggs                    1 tsp vanilla
1/4 tsp salt             2/3 cup flour

Preheat oven to 350°F.

Line an 8×8-inch square baking pan with aluminum foil. Be sure that ends of foil extend over opposite sides of the pan. Butter foil.

Melt white or semi-sweet chocolate and butter together pot of water.

Whisk in sugar and eggs, one at a time, then add vanilla.

Add flour and salt together, stirring until just combined. Spread into prepared pan.

Repeat this recipe with the other kind of chocolate and a second 8×8-inch square pan.

Bake for 23-25 minutes (I took mine out after 24 minutes).

Cool pans on a wire rack at room temperature for 10 minutes then continue cooling in the freezer (frozen brownies are much easier to make clean cuts from). Once solid, transfer brownies in their foil to a large cutting board. Carefully press the cookie cutter into the brownies and slowly pull out the heart shaped center. Repeat. Once 1 row has been completed, cut the row off from the rest of the sheet and then cut into individual pieces. Continue using the cookie cutter to cut out heart shapes. Cut final pieces. (Instead of cutting the sheet of brownies into individual pieces and then using the cookie cutter I decided to do it in the reverse order and found it to be much more successful).

Insert the dark cut-outs into the centers of the light brownies, and vice-versa. From here, you can let them warm up to room temperature or wrap them up in the freezer until you will need them.

Read Full Post »

There are some things that I don’t like to do when baking.

I don’t enjoy prepping baking pans with butter/shortening and flour. I refuse to sift my dry ingredients together, talk about a major waste of time. Pie crusts freak the heck out of me but I’m willing to do it because the taste of a homemade pie crust trumps any pre-made crust hands down. I detest cutting shortening into dry ingredients but I also don’t like using a pastry blender. Normally I am not a fan of forming cookies, and last but certainly not least, I have no desire to cut the finished product or to dish food out.

But I love baking. I swear.

Let me start by saying that these cookies are delicious. My pictures don’t do them justice. Chocolate sandwich cookies and then white chocolate peppermint filling. Yes you read that right, white chocolate peppermint filling. Joy the Baker, you my friend, are a genius. I only wish that my filling would have been as pretty as yours instead of being runny.

The bad news…these cookies made me incredibly angry. They were frustrating to make and a number of times I just about threw the rolling pin. Not good. The dough didn’t seem to stick together for me so when the instructions told me to shape the dough I had quite a difficult time. Maybe my problems were due to the fact that I don’t have an electric mixer, or maybe my patience was just running low that day. Who knows.

In the end these cookies were worth the hard work. I guess that means that I’m still on good terms with Joy.

Chocolate Mint Sandwich Cookies

Adapted from Joy the Baker

Cookies

3/4 cup granulated sugar              1 1/2 cups + 3 tbsp flour

3/4 cup + 1 tbsp cocoa powder     1/2 tsp baking soda

1 1/2 tsp salt                                 1/2 cup + 7 tbsp butter at room temperature

 Preheat oven to 350F and line 2 baking sheets with parchment paper.

Combine the sugar, flour, cocoa powder, baking soda and salt. Add the butter a few pieces at a time and mix with an electric mixer.  Continue mixing until peddle-size pieces form.  

Transfer the ball of dough to a board and use the heel of your hand to shape the dough into a 5 by 7 inches rectangle. Cut the block into two pieces.

One at a time, roll each block of dough between two pieces of lightly floured parchment paper until about 1/8-inch thick.  Using a cookie cutter, cut into 2 inch rounds (I used the mouth of a glass).  

Bake for 12-15 minutes.  Remove from the oven and cool on the sheets for 5 minutes. Transfer the cookies to a cooling rack and let cool completely.

White Chocolate Peppermint Filling

1/2 cup whipping cream           1 cup white chocolate chips

1/4 tsp peppermint extract (more can be used if desired)

In a small saucepan, bring the cream to boil over medium heat.  

Remove from the heat and add the white chocolate chips and peppermint extract.  Make sure all the chocolate is covered by the cream.  Let stand for 1 minute (this is important), then whisk the white chocolate until completely melted.

Transfer the filling to a small bowl and let stand until room temperature.  

Place filling in the refrigerator for 30 minutes or an hour, until a thick consistency is reached.  (Mine was left overnight and was still a bit runny so I decided to add icing sugar to the mix).

Assembly

Place half of the cookies upside down on a work surface.  

Spoon filling onto the tops of half of the cookies and top with another cookie. Press the cookies together until the filling comes just to the edges.

Read Full Post »

Remember when I had this cake for my birthday? It was amazing. But it was one of the few times in my life when I had a homemade cake for my birthday.

Regardless of who the family member is, immediate or extended family, we always seem to purchase birthday cakes from a local bakery…or the infamous Dairy Queen with her delectable ice cream cake. 

Gone are the days when every year without fail the birthday person would get their own special cake. Family members have told me about how they used to have angel food cake and bananas with whipping cream for one persons birthday, strawberry shortcake for another, ski cake for someone else, and, for another family member, this pineapple upside down cake.

I think I’ve decided that I don’t want to have one specific birthday cake every year of my life. I’d rather mix it up every year, try something new. After all, a little variation never hurt anyone. One request though, that the cake be  homemade please.

This as a birthday cake probably wouldn’t go over very well for some. However, served as a cold night in February Sunday night treat, it hits the spot. I almost felt as if I was in Hawaii or somewhere tropical with the pieces of pineapple. How I wish!

The caramel sauce that is on the top…bottom…top? of the cake adds the perfect sweetness to the cake. Be mindful when baking that you do cook the cake for long enough. My toothpick came out of the pan clean so I flipped the cake only to find that it needed a bit more time in the oven. Fortunately the dish that I had put the cake on was able to go in the oven so back it went. A near baking disaster #3 avoided.  

Go make this, crank up the heat in your place, wear something summer-y, and pretend that you’re lounging in Hawaii.

Pineapple Upside Down Cake

Cake

1/3 cup butter          2/3 cup sugar

2 eggs, separated   2/3 cup pineapple juice

1 1/2 cups flour        3 tsp baking powder

1/3 tsp salt              1/2 tsp vanilla

Preheat oven to 375F.

Cream butter and add sugar.

Add beaten egg yolks and vanilla.

Add flour, baking powder and salt, then mix in the pineapple juice. (I didn’t quite have 2/3rds of a cup of juice so I added a bit of water to top it off).

Fold in stiffly beaten egg whites.

Caramel Sauce

4 tbsp butter    1 cup brown sugar

1 can of pineapple rings

Melt butter and brown sugar in the cake pan you plan to use (I used a 9″ pan). When thick and syrupy mix the sauce together and ensure that it covers the bottom of the pan.

Place rings (or slices) of pineapple in the syrup. If desired place half a maraschino cherry in the center of the pineapple ring. Pour the cake batter over the fruit.

Bake for 35 minutes or until done. Remove from the cake pan at once, turning upside down so fruit is on top.

Serve with whipping cream.

Read Full Post »

All right, here it comes, I’m about to admit something that will probably make you think that I’m a horrible person.

I’ve turned into a baking snob.

A baking princess perhaps?

I just don’t like it when it’s treat day at work and someone brings store-bought goods, or something that takes very little effort. See, I get really excited for treat day. It’s kind of a big deal. And I don’t like being let down.

In some situations, such as this one, I’m a real go-getter. So I solved the problem, I simply volunteered to take on a number of treat days. End result: these, those and this cream cheese brownie. I figure that it’s a win-win situation. I get to bake, which I enjoy doing, I get to eat good treats, and so do the others. Being a princess can be a good thing, right?

All snobby-ness aside though, these brownies were seriously unreal. The perfect combination of chewy brownie and delicious cream cheese to top it all off. Decadent, melt in your mouth amazingness. They were a big hit too, I won’t mention any names but let’s just say that there were a few people who were taking seconds for later on. I can’t blame them though, smart colleagues those people are!

Let’s just say that there were some very happy people at the school when they found out that me and my baking would be sticking around for another semester…


Cheesecake Marbled Brownies

Adapted from Smitten Kitchen

Brownie Batter

1/2 cup butter             1/2 package semi-sweet mini chocolate chips

1 cup sugar                 2 eggs
1/2 tsp pure vanilla     2/3 cup flour

Preheat oven to 350°F. Grease an 8-inch square baking pan.

Heat butter and chocolate in a saucepan over moderately low heat until melted.

Remove from heat and whisk in sugar, eggs, vanilla, and a pinch of salt until well combined.

Whisk in flour until just combined and spread in baking pan.

Cheesecake batter
8 ounces cream cheese     1/3 cup sugar
1 egg yolk                          1/4 tsp vanilla

Plus
1/2 cup semisweet chocolate chips

Whisk together cheesecake batter ingredients in a small bowl until smooth. Dollop over brownie batter, then swirl in with a knife or spatula.

Sprinkle chocolate chips over cheesecake/brownie batter swirl.

Bake for 35 minutes or until center is just set.

Read Full Post »